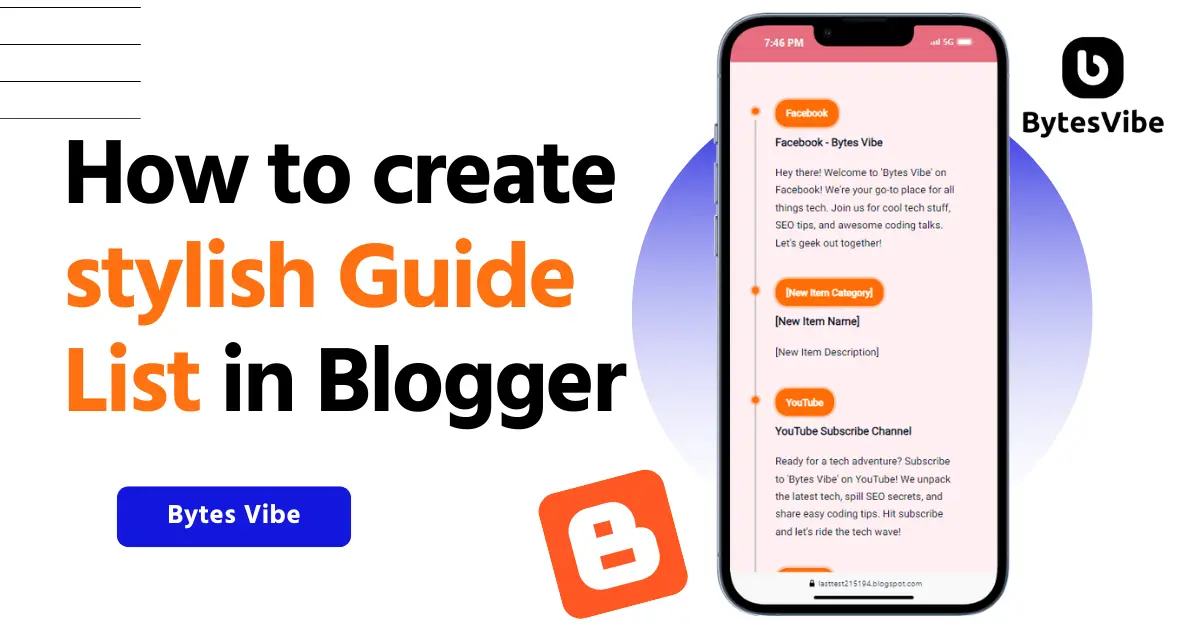
Welcome to Bytes Vibe another Blogger tutorials. In this guide, I will teach everyone on How to create a guide list in blogger site. Originally we can see this guide list from Jago Desain but this guide list doesn’t work in any other blogger theme other than Fletro or Median Ui blogger themes that are owned by Jago Desain.

But Bytes Vibe will help every blogger users who use other blogger themes to add this beautiful Guide list or Link tree in every blogger theme. Creating a guide list on Blogger site is an excellent way to organize and present blogger content in a structured and easy-to-navigate format.
If you’re curating a series of tutorials, tips or resources than a guide list helps blogger readers find the information they need quickly and efficiently. In this post, Bytes Vibe will teach on the steps to create a guide list on Blogger site. Making sure that this link tree or blogger list is responsive, visually appealing, and user-friendly.
How to Create Create a Guide List in Blogger site
The process of creating and adding a stylish list in blogger posts is easy process. But make sure to take backup of blogger site. Follow these steps to Add Custom List Style on Blogger:
Step 1: Add CSS in blogger theme
If we want to Change Bullet Point Style in Blogger than we need to add css in our blogger theme. To add css in blogger theme follow these –
- Log in to blogger and from there go to Theme section.
- Click on Edit Html and in new window search for
</head>tag. - Paste the following css codes above the closing head tag:
<style>
.brdCmb {
  display: none;
}

.pBd h1,
.pBd h2,
.pBd h3,
.pBd h4,
.pBd h5,
.pBd h6 {
  margin: 0em 0 0px;
}

h1 {
  font-size: 60px;
  text-align: center;
}

.BytesVibe {
  position: relative;
  margin: 50px auto;
  padding: 40px 0;
  width: 100%;
  box-sizing: border-box;
}

.BytesVibe:before {
  content: '';
  position: absolute;
  left: 50%;
  width: 2px;
  height: 100%;
  background: #c5c5c5;
}

.BytesVibe ul {
  padding: 0;
  margin: 0;
}

.BytesVibe ul li {
  list-style: none;
  position: relative;
  width: 50%;
  padding: 20px 40px;
  box-sizing: border-box;
}

.BytesVibe ul li:nth-child(odd) {
  float: left;
  text-align: right;
  clear: both;
}

.BytesVibe ul li:nth-child(even) {
  float: right;
  text-align: left;
  clear: both;
}

.Product-Ctnt {
  padding-bottom: 20px;
}

.P-Lnk {
  text-decoration: none;
  color: #08102b;
  transition: all 0.2s;
}

.P-Lnk:hover {
  opacity: 0.8;
  transition: all 0.2s;
}

.BytesVibe ul li:nth-child(odd):before {
  content: '';
  position: absolute;
  width: 10px;
  height: 10px;
  top: 24px;
  right: -6px;
  background: #ff6d05;
  border-radius: 50%;
  box-shadow: 0 0 0 3px #Ee630047;
}

.BytesVibe ul li:nth-child(even):before {
  content: '';
  position: absolute;
  width: 10px;
  height: 10px;
  top: 24px;
  left: -4px;
  background: #ff6d05;
  border-radius: 50%;
  box-shadow: 0 0 0 3px #Ee630047;
}

.BytesVibe ul li h3 {
  padding: 0;
  margin: 0;
  color: #08102b;
  font-weight: 600;
}

.BytesVibe ul li p {
  margin: 20px 0 0;
  padding: 0;
  font-size: 15px;
  line-height: 1.7em;
}

.BytesVibe ul li .Prct-ctgy h4 {
  margin: 0;
  padding: 0;
  font-size: 14px;
  color: #ffffff;
}

.BytesVibe ul li:nth-child(odd) .Prct-ctgy {
  position: absolute;
  top: 12px;
  right: -165px;
  margin: 0;
  padding: 8px 16px;
  background: #ff6d05;
  color: #fff;
  border-radius: 18px;
  box-shadow: 0 0 0 3px #Ee630047;
}

.BytesVibe ul li:nth-child(even) .Prct-ctgy {
  position: absolute;
  top: 12px;
  left: -165px;
  margin: 0;
  padding: 8px 16px;
  background: #ff6d05;
  color: #fff;
  border-radius: 18px;
  box-shadow: 0 0 0 3px #Ee630047;
}

@media (max-width: 1000px) {
  .BytesVibe {
    width: 100%;
  }
}

@media (max-width: 767px) {
  .BytesVibe {
    width: 100%;
    padding-bottom: 0;
  }

  h1 {
    font-size: 40px;
    text-align: center;
  }

  .BytesVibe:before {
    left: 20px;
    height: 100%;
  }

  .BytesVibe ul li:nth-child(odd),
  .BytesVibe ul li:nth-child(even) {
    width: 100%;
    text-align: left;
    padding-left: 50px;
    padding-bottom: 50px;
  }
.BytesVibe ul li:nth-child(odd):before,
.BytesVibe ul li:nth-child(even):before {
  top: -18px;
  left: 16px;
}

.BytesVibe ul li:nth-child(odd) .Prct-ctgy,
.BytesVibe ul li:nth-child(even) .Prct-ctgy {
  top: -30px;
  left: 50px;
  right: inherit;
}
</style>Code language: HTML, XML (xml)
Now click on save and save all of these blogger settings to Add Custom Numbering List Style on blogger.
Step 2: Create a blogger post
Now after saving css in blogger theme, we need to add the html to Create a stylish Guide List in Blogger Site. Follow these steps below –
- Log in to Blogger and go to posts section. Click on Create New Post or in any post where you want to add this guide list of Blogger.
- If blogger post format is in Compose mode change it to Html View.
- Now paste all the html code in where you want this Guide List to appear:
<div class="BytesVibe">
  <ul>
    <li>
      <div class="Product-Ctnt">
        <h3>
          <a class="P-Lnk" href="#">Facebook - Bytes Vibe</a>
        </h3>
        <p>
          <a class="P-Lnk" href="#">
            Hey there! Welcome to 'Bytes Vibe' on Facebook! We're your go-to
            place for all things tech. Join us for cool tech stuff, SEO tips,
            and awesome coding talks. Let's geek out together!
          </a>
        </p>
      </div>
      <div class="Prct-ctgy">
        <h4><a href="#" style="color: white;">Facebook</a></h4>
      </div>
    </li>

    <li>
      <div class="Product-Ctnt">
        <h3>
          <a class="P-Lnk" href="#">YouTube Subscribe Channel</a>
        </h3>
        <p>
          <a class="P-Lnk" href="#">
            Ready for a tech adventure? Subscribe to 'Bytes Vibe' on YouTube! We
            unpack the latest tech, spill SEO secrets, and share easy coding
            tips. Hit subscribe and let's ride the tech wave!
          </a>
        </p>
      </div>
      <div class="Prct-ctgy">
        <h4><a href="#" style="color: white;">YouTube</a></h4>
      </div>
    </li>

    <li>
      <div class="Product-Ctnt">
        <h3>
          <a class="P-Lnk" href="#">Pinterest Collection</a>
        </h3>
        <p>
          <a class="P-Lnk" href="#">
            Pin your tech dreams with 'Bytes Vibe' on Pinterest! Discover boards
            full of SEO tricks, web design ideas, and easy tech hacks. Follow
            us, and let's turn those tech dreams into reality!
          </a>
        </p>
      </div>
      <div class="Prct-ctgy">
        <h4><a href="#" style="color: white;">Pinterest</a></h4>
      </div>
    </li>

    <li>
      <div class="Product-Ctnt">
        <h3>
          <a class="P-Lnk" href="#">Join WhatsApp Group</a>
        </h3>
        <p>
          <a class="P-Lnk" href="#">
            Quick tech chats await you in the 'Bytes Vibe' WhatsApp group! Join
            for instant tech talks, exclusive updates, and fast access to our
            tech experts. It's like a tech hangout – join the party!
          </a>
        </p>
      </div>
      <div class="Prct-ctgy">
        <h4><a href="#" style="color: white;">Whatsapp Group</a></h4>
      </div>
    </li>

    <li>
      <div class="Product-Ctnt">
        <h3>
          <a class="P-Lnk" href="#">Follow On Instagram</a>
        </h3>
        <p>
          <a class="P-Lnk" href="#">
            Dive into the tech world with 'Bytes Vibe' on Instagram! We've got
            cool tech pics, behind-the-scenes coding fun, and an inside look at
            our community. Follow us for your daily tech fix!
          </a>
        </p>
      </div>
      <div class="Prct-ctgy">
        <h4><a href="#" style="color: white;">Instagram</a></h4>
      </div>
    </li>

    <div style="clear: both;"></div>
  </ul>
</div>Code language: HTML, XML (xml)
Now you can change all the texts, heading and add link in this stylish and beautiful guide list. If you don’t need a section than you can remove it from here or add another. This is the part that you need to modify. I am using one as an example but all are same –
<li>
  <div class="Product-Ctnt">
    <h3>
      <a class="P-Lnk" href="#">[New Item Name]</a>
    </h3>
    <p>
      <a class="P-Lnk" href="#">
        [New Item Description]
      </a>
    </p>
  </div>
  <div class="Prct-ctgy">
    <h4><a href="#" style="color: white;">[New Item Category]</a></h4>
  </div>
</li>Code language: HTML, XML (xml)
Just replace [New Item Name], [New Item Description], and [New Item Category] with desired values. You need to add these just after </li> section.
So this is How to Create a Guide List in Blogger Site. This tutorial might feel a bit complicated but its easy once you got the idea how its work. Just add the css and use html inside the blogger post and change the texts. Hoped this was helpful. If you have any questions you can comment here or discuss it in Bytes Vibe telegram group.


