Hello everyone! Welcome to Bytes Vibe website. Lately I have been thinking that – enough with Blogger tutorials and now I should create some WordPress tutorials for guys who are new to wordpress and want to use wordpress to create websites. So in this wordpress tutorial guide, I will teach you guys – How to install wordpress on cPanel with just 5 steps.
Installing WordPress is a very simple process that opens up countless possibilities for creating a stunning website. With wordpress we can create any site we want like e-commerce site, news site, landing pages etc.
Why Choose WordPress?
Now many of us might think – why we need to use wordpress when there are many cms available. Its because: WordPress powers over 40% of websites worldwide. This makes it one of the most popular content management systems (CMS) available. WordPress is beginner friendly, highly customizable and has a massive community for support. Plus, it’s free and open source!
Requirements for Installing WordPress
Now before we learn how to install wordpress and jump into the installation steps, here’s what we will need to install wordpress:
- A Domain Name – This is the address people use to find our website (like
www.bytesvibe.com). - Web Hosting – A hosting provider to store our website’s files and make it accessible online.
How to install WordPress?
Now if you have a domain name and a hosting than you are ready to install wordpress. Now let’s check out the steps to install wordpress from cpanel. Follow these steps to install wordpress:
Step 1: Choose a Web Hosting Provider
If we want to install WordPress, we will need a hosting provider. Because without hosting or a space, we can’t install wordpress. Here are some popular ones to from where we can buy hosting:
- Bluehost – Recommended by WordPress, beginner-friendly.
- SiteGround – Known for speed and excellent support.
- HostGator – Affordable and great for small websites.
- Amar Hoster – For Bangladeshi People, Fast and can be paid via Nagad or Bkash.
Tip: Look for a hosting provider that offers one-click WordPress installation (Softaculous) as it makes the process much simpler. Most of hosting provider have this option. So no need to worry.
Once you’ve selected a hosting provider, buy a hosting plan that meets your website’s needs. Many hosting providers offer domain registration and SSL certificates as part of their plans. So check out all the packages and make sure to get the best deal.
Step 2: Log into Hosting Control Panel (cPanel)
Nowadays most hosting providers use cPanel. This makes it easy to install applications like WordPress. After setting up our hosting account. We need to log into our cPanel dashboard. The dashboard should look something like this:
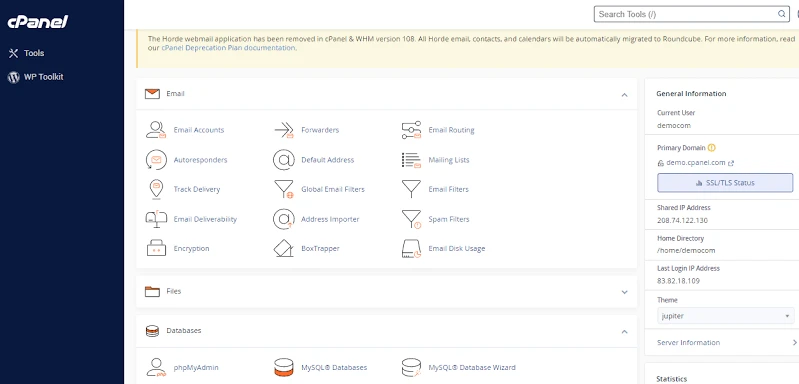
In the cPanel, we will find tools for managing files, domains, databases, website software installations and many more.
Step 3: Use One Click WordPress Installation
Most hosting providers offer one-click WordPress installation tools in cPanel. This is labeled as “Softaculous”. Follow these steps to install wordpress:
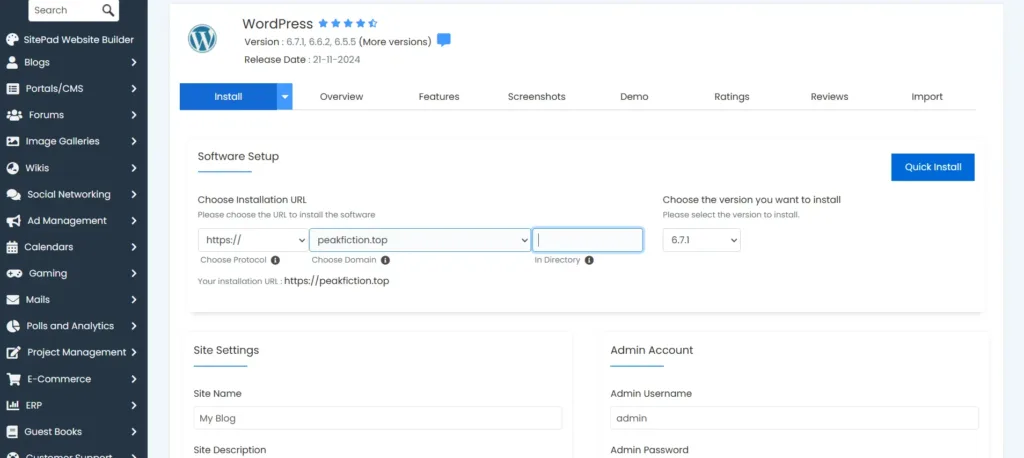
- Find the WordPress Installer: Find the “Softaculous” option in cPanel. It’s usually at the end part.
- Launch the Installer: After opening Softaculous, they will open a new page where will find options to install wordpress.Click on the Install button to start the setup. Now after clicking on Install we need to customise.
- Choose Protocol: First, we need to choose Protocol for our website. Click on the first box and you will get many option like www, http://www etc. Usually choose the https://www as it look more secure and most site use this protocol.
- Choose Domain: If you’ve registered multiple domains, than choose the one you want for this website.
- Fill in Basic Information:
- Site Name: The name of our website.
- Site Description: A short tagline or description that represents our site.
- Admin Username and Password: Choose a secure username and password and email for logging into WordPress.
- Select Language and Settings: Choose preferred language and basic settings.
- Choose theme: Click on theme and choose any basic theme you want to install with wordpress.
- Start Installation: Click the install button to begin the process.
No need to worry about this settings because we can always change them later from wordpress dashboard.
The installer will take a few moments to install wordpress. And once completed, it will display information on WordPress login URL, admin username, and password. Save this information securely.
Now this is How to install wordpress from cpanel. We can now close these windows and do WordPress dashboard setup.
Step 4: Log into WordPress Admin Dashboard
After Basic WordPress configuration, we can easily log in to our WordPress login page or wordpress dashboard. Many of people don’t know how to log in to wordpress admin or dashboard after Installing WordPress on hosting. We can easily log in to our wordpress dashboard by www.yourdomain.com/wp-admin, and log in with the admin username and password we created when we installed wordpress from cpanel.
After log in with right information, we will be on WordPress dashboard. From here we can manage and customise wordpress site. This is where we will add content, install themes and plugins, and adjust settings.
Step 5: Basic WordPress Setup and Configuration
Once logged in to wordpress dashboard, here are some basic steps that we can do to set up our WordPress website:
- Change Site Title and Tagline:
- Go to Settings > General to update our site’s title and tagline.
- Set Permalinks:
- Go to Settings > Permalinks and select the “Post name” option for SEO-friendly URLs.
- Install a Theme:
- Go to Appearance > Themes, and choose or upload a theme that suits our website.
- Install Essential Plugins:
- Research for plugin and choose the plugin that we need for our website. Some of best wordpress plugin are:
- Yoast SEO for search engine optimization.
- Jetpack for security and performance.
- Akismet to block spam comments.
- Research for plugin and choose the plugin that we need for our website. Some of best wordpress plugin are:
- Create Essential Pages:
- Make sure to create Home, About, Contact, and Blog pages. These pages are usually essential for most sites.
Now these were basic for WordPress setup tutorial. Check out other settings and choose the right things with your own preferences.
SEO Tip: Install an SEO plugin like Yoast to optimize wordpress site for search engines right from the start. Check out these 10 free seo tools for more.
Step 6: Launch WordPress Website
Now if you have done all these 5 steps correctly than Congratulations!. You’ve installed WordPress and successfully got a website. Now spend some time customizing and adding content before sharing it with the world. When you think you are ready, connect your website with Google search console or other search engines and start sharing content with others.
Bonus Tip: Regularly update WordPress, themes, and plugins to keep wp site secure and perform optimally.
Q1. Can I install WordPress without hosting?
Yes, you can install WordPress locally on computer using software like XAMPP or WAMP. This is great for testing and development but not for professional use.
Q2. How much does WordPress hosting cost?
The cost varies by provider and plan, but expect to pay around $2-$10 per month for basic shared hosting.
Q3. What if I forget my WordPress login?
You can reset your wordpress password using the “Lost your password?” link on the login page or through your hosting provider’s cPanel.
Conclusion
Installing WordPress is the first step to creating our own website and sharing our ideas with the world. We can use wordpress for building a blog, business site, or online store. WordPress provides all the tools we need to succeed. Now that we know how to install WordPress, we need to go ahead and start creating our unique online presence with confidence!
By following these steps, we will have have a solid foundation for building a wordpress website that’s both functional and easy to manage. Happy blogging!


