Hello guys! Again welcome to Bytes Vibe. In this post, I will guide you on adding a custom robots.txt for blogger website. And also the whole Crawlers and Indexing section of blogger. In our previous post, we learned how to add a custom domain in our blogger website. After adding a custom domain to blogger, the first thing you need to do is to turn on the robots txt on blogger settings.

Table of Contents
In this post we will cover the whole Crawlers and Indexing section of Blogger. The topics are –
- Enable custom robots.txt
- Enable custom robots header tags
- Home page tags
- Archive and search page tags
- Post and page tags
What is robots.txt file?
A robots.txt file is a text file that webmasters create to instruct search engine crawlers (or robots) about which pages or sections of the site they can or cannot crawl. By customizing your robots.txt file, you can enhance your site’s SEO performance, prevent sensitive information from being indexed, and improve your overall site management.
Check robots.txt for blogger site
If you want to check your robots.txt in your blogger site than follow these steps:
- Open your web browser. Type the following URL into the address bar, replacing
yourwebsite.comwith your actual domain:https://yourwebsite.com/robots.txt - Press Enter. If the file exists, its content will be displayed. If not, you’ll likely see a 404 error.
How to Add robots.txt file in Blogger
Now if you are thinking to setup best custom robots.txt for blogger than you need to follow these steps below:
Step 1: Log into Your Blogger Account
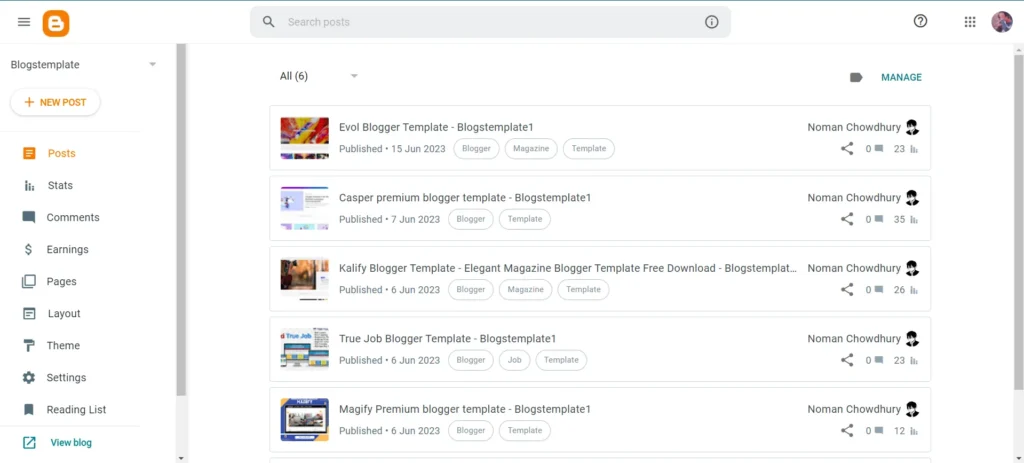
First, sign in to your Blogger account and once you’re in the dashboard, go to the left-hand menu and click on Settings.
Step 2: Enable Custom Robots.txt
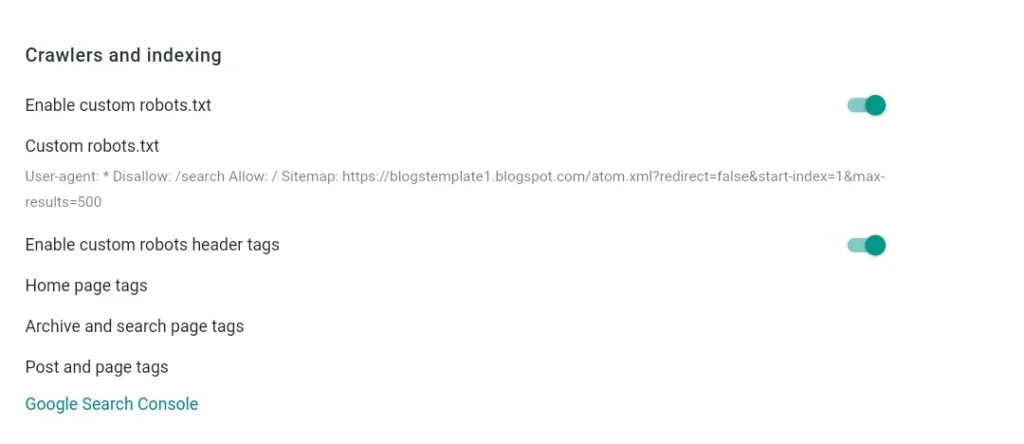
Scroll down in the Settings menu until you find the Crawlers and Indexing section. Here, you will see an option labeled Enable custom robots.txt. By default, this option is turned off. Toggle the switch to enable it.
Step 3: Add Your Custom Robots.txt Code
Once you enable custom robots.txt, a new text box will appear where you can enter your custom robots.txt code. Below is the best custom robots.txt for blogger :
User-agent: *
Disallow: /search
Allow: /
Sitemap:https://<strong>yourblogname</strong>.blogspot.com/sitemap.xml
Sitemap: https://yourblogname.blogspot.com/sitemap-pages.xml
Code language: HTML, XML (xml)
Be sure to change your domain name on sitemap. Or if you want to use custom robots.txt generator for blogger than you can use many online tools that are available on internet like from the one from this Robots.txt Generator or labnol.
Enabling Custom Robots Header Tags
In addition to adding a robots.txt file, you should also configure custom robots header tags to have more control over how individual pages, posts, and sections of your site are indexed.

Still in the Settings under Crawlers and Indexing, look for the option labeled Enable custom robots header tags. Turn this on.
1st step: Configure Home Page Tags
Once you turn on robots header tags from blogger settings, you’ll see options to configure header tags. For the Home page tags, it’s typically recommended to select:
- all: This allows all bots to crawl and index the home page.
- noodp: This prevents search engines from using directory descriptions (like from DMOZ) for your homepage.
2nd step: Configure Archive and Search Page Tags
For Archive and search page tags, a common setting is:
- noindex: This prevents these pages from being indexed, which helps to avoid duplicate content issues.
- nofollow: This prevents search engines from following links on these pages.
3rd step: Configure Post and Page Tags
For individual Post and page tags, you’ll typically want to allow indexing. A good configuration is:
- all: Allowing full indexing and following of links.
- noodp: Preventing directory descriptions from being used.
4th step: Save Your Settings
After configuring each section, don’t forget to click Save to apply your changes.
In this way you can add custom robots txt code to blogger site and also can cover all the tags you need. Now you can check again if your custom robots.txt are updated by checking on browser like you did before.
Hope this helped. If you have any problems with adding blogger Custom robots txt on blogger than comment them below.

